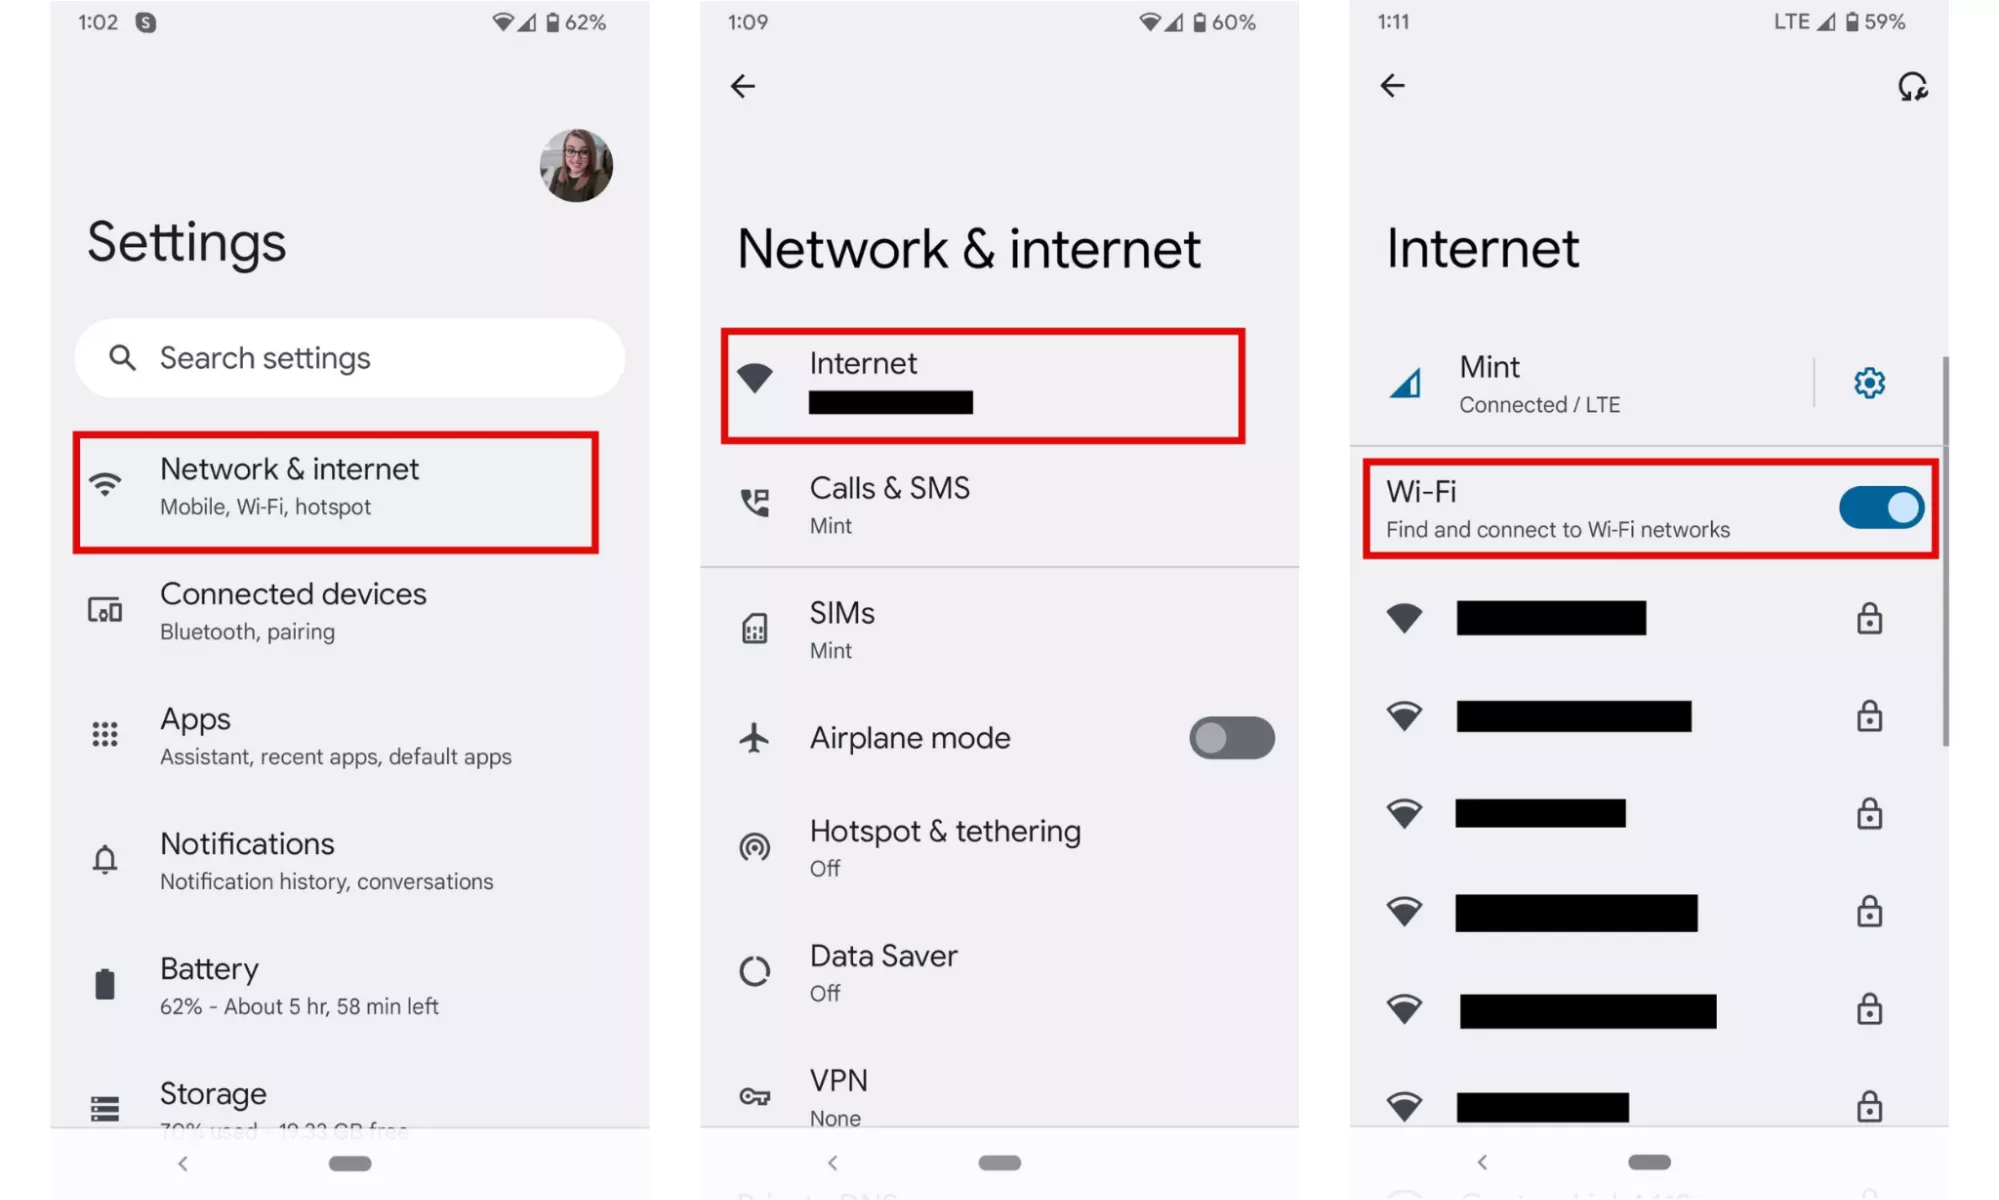
Setting up Unity wireless internet on your Android phone can be a straightforward process if you follow the correct steps. Firstly, from the home screen, you need to navigate to the settings menu and select the ‘Wi-Fi’ option. Ensure the Wi-Fi switch is turned on, and your device will automatically start searching for available networks.
From the list of networks, find the ‘Unity’ network and click on it to connect. If prompted, you’ll need to enter the appropriate network security key or password, which is usually provided by the network administrator or ISP. Once you’ve inputted the correct details, your phone should connect to the Unity wireless network effortlessly.
If you encounter any issues, you might need to check the network settings or consult with a tech expert. Overall, it’s a simple procedure that can enable you to enjoy seamless internet connection on your Android device.

Getting Started: Essential Requirements Before Setup
Before setting up any new venture, whether it’s a business, a project, or even a personal goal, there are some fundamental requirements that must be attended to. Firstly, it is important to have a clear and well-defined plan. This plan should outline the objectives, strategies, and tactics that will be used to achieve the desired outcome. In addition to this, adequate resources must also be available. These may include financial resources, human resources, technology, and time. Without these, it could be difficult to effectively implement the plan.
Next, it’s necessary to ensure that all the relevant permissions and approvals have been obtained. For a business, this could involve obtaining business licenses, permits, and certifications. For a project, this could involve getting approval from the project’s stakeholders or sponsors. Moreover, it’s crucial to have a robust risk management strategy in place. This should identify potential risks, assess their impact, and lay out strategies for mitigating them.
It’s also essential to have a strong support system. This could be in the form of a team, mentors, advisors, or even supportive family and friends. They can provide valuable advice, guidance, and moral support during the setup process. Furthermore, continuous learning and adaptability are vital. The world is constantly changing, and so the ability to learn and adapt to these changes can significantly increase the likelihood of success.
In conclusion, starting any new venture requires careful planning, adequate resources, necessary permissions, risk management, a strong support system, and the ability to learn and adapt. By ensuring these essentials are in place, the process of setting up can be smoother, more efficient, and more likely to reach the desired outcome.
Configuring APN Settings: Step-by-Step Guide to Setting Up APN on Your Android Device
Access Point Name (APN) is a crucial aspect of your mobile device that allows it to connect with the internet. If you’re using an Android device and experiencing issues with your internet connectivity, modifying your APN settings could potentially resolve these issues. Here’s a step-by-step guide to help you configure your APN settings on an Android device.
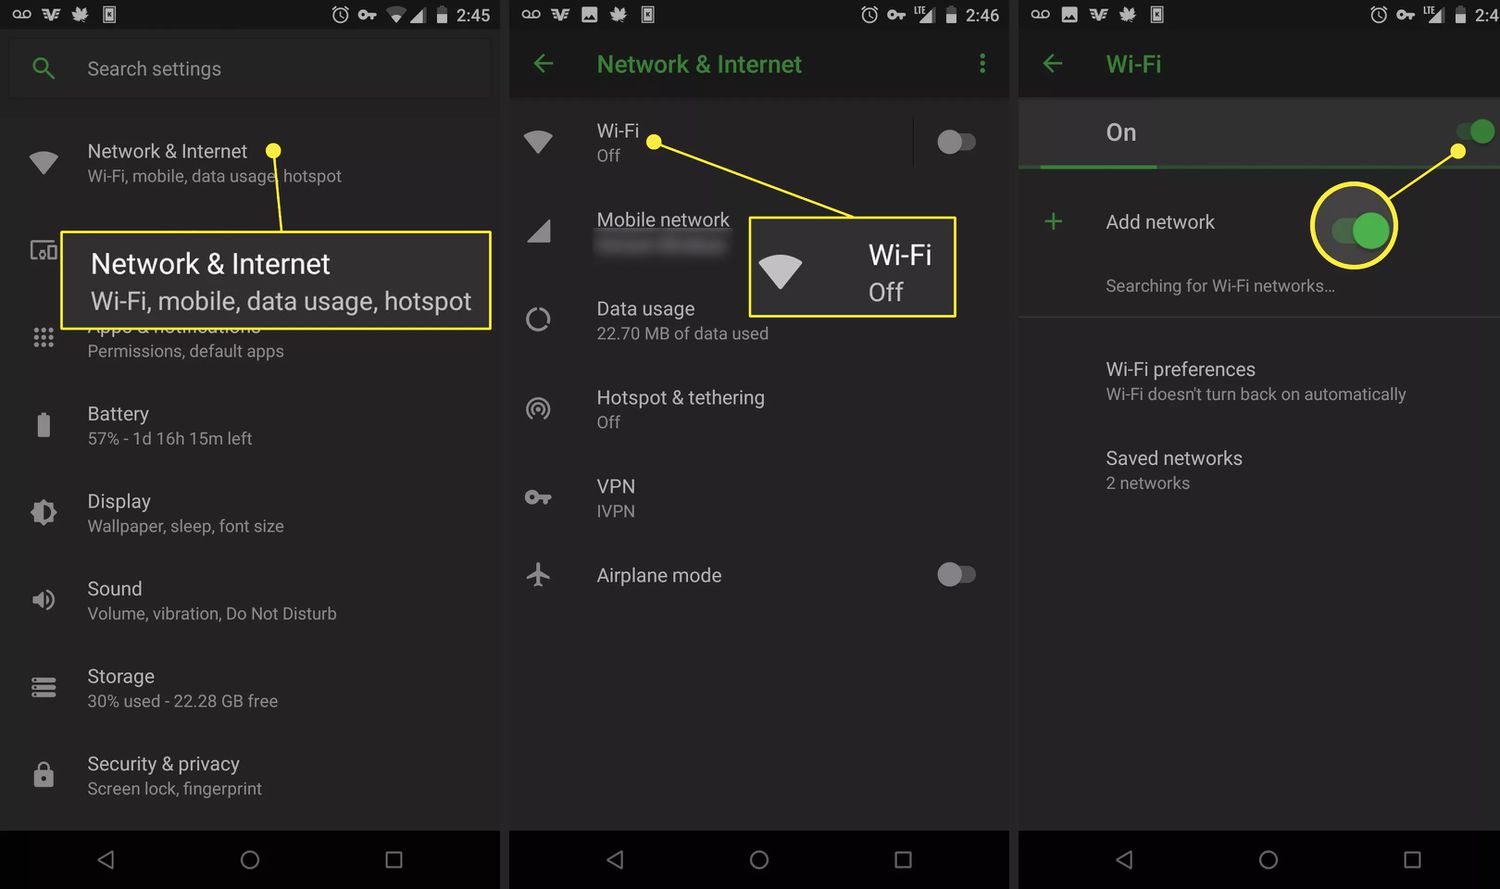
First, navigate to the “Settings” menu on your device. From there, proceed to the “Wireless & Networks” section, where you’ll find “Mobile Networks”. Click on it, and you’ll find the “Access Point Names” option. Select it to access the APN settings.
Before making any changes, it’s highly recommended to note down the current settings, in case you need to revert back. Now, tap on the “Add” option, usually symbolized by a “+” sign at the top right corner of the screen. This action will allow you to create a new APN setting.
At this point, you’ll need to input the details provided by your network provider. These details typically include the name of the APN, the APN itself, the proxy, port, username, password, server, MMSC, MMS proxy, MMS port, MCC, MNC, authentication type, and APN type. These fields may vary slightly depending on your Android version and device model.
Once all the details have been filled out accurately, tap on the three dots at the top right corner of the screen. Select “Save” from the drop-down menu that appears. Once saved, you’ll see the newly created APN on the list of APNs. To activate it, tap on the circle next to it. It should now be filled, marking it as the active APN.
Restart your device after these changes to ensure the new settings take effect. Please bear in mind that these steps may not resolve all internet connectivity issues. Should the problem persist, it’s advisable to reach out to your network provider for further assistance.
Connecting to Unity Wireless Network: Establishing a Connection to Unity’s Internet Service
Unity Wireless Network is a reliable internet service provider that offers seamless and uninterrupted internet connectivity. Establishing a connection to Unity’s internet service requires a few simple steps. Initially, ensure that your device’s Wi-Fi is activated. Navigate to your device’s network settings and select the option to view available networks. Among the list of networks, you should find one labeled ‘Unity Wireless Network’. Click on this network to initiate the connection process.
Generally, Unity’s network is password-protected for security purposes. The password, usually provided at the time of service installation, is necessary to connect. Input the password when prompted. Some devices may require you to accept terms of service before establishing a connection. Ensure you carefully read through these terms before agreeing to them.
Once connected, your device should automatically remember the network and reconnect whenever it’s within range. If the connection is unstable or drops, try moving closer to the router as walls or other obstructions may interfere with the signal. If issues persist, you may need to restart your device or the router. Regularly updating your device’s software can also help maintain a strong and stable connection.
It’s worth noting that the number of devices connected to the Unity Wireless Network can affect its speed. If you find your connection is slower than usual, it might be due to multiple devices using the network simultaneously. Disconnecting some devices can help enhance your internet speed. By following these steps, you should be able to establish a seamless connection to Unity’s internet service, ensuring smooth browsing, streaming, and downloading experiences.
Remember, Unity Wireless Network is committed to providing reliable and efficient internet service. In case of any ongoing issues or concerns, don’t hesitate to contact Unity’s customer service for further assistance. They are available around the clock to ensure their customers enjoy consistent and high-speed internet connectivity.
Registration and Data Connectivity Confirmation: Ensuring Successful
Registration and data connectivity confirmation are paramount processes in the digital world that ensure successful system operations. Registration lays the foundation for individual user identification, setting in motion the basis for a personalized user experience. It involves inputting vital personal information into a digital system to create a unique profile or account. This information is typically stored securely and used to track, customize, and enhance the user’s interaction with the system.
On the other hand, data connectivity confirmation is a critical step that verifies the successful linking of devices or systems for data transfer. This process assesses the ability of the registered device or user to access, retrieve, and transfer data across a network. It’s an assurance that the connectivity is functioning effectively, enabling smooth data exchange without interruptions.
Both processes are critical in ensuring seamless digital interaction. To guarantee successful registration, systems must be designed to capture accurate user information and store it securely. They should also provide intuitive user interfaces that are easy for users to navigate during the registration process.
Equally important is the data connectivity confirmation process. Systems should have robust mechanisms for verifying data connectivity. They should be capable of detecting any connectivity issues and providing appropriate feedback to the users. This may involve sending notifications or alerts in case of any connectivity problems.
These processes work hand in hand. A successful registration sets the stage for effective data connectivity. Once a user is registered, they can then connect and interact with other systems or devices. And with data connectivity confirmed, the user can seamlessly exchange information, enhancing their digital experience. Therefore, it’s crucial for digital system developers to prioritize these processes to ensure their systems deliver optimal performance and user satisfaction.
Monitoring Data Usage: Tips and Tools for Tracking Your Data Consumption
Monitoring data usage is an essential task in today’s digital age. With the advent of smartphones, tablets, and other internet-dependent devices, it’s easy to exceed your data limit unknowingly. Thankfully, there are various tips and tools to help you track your data consumption effectively.
Primarily, it’s crucial to understand what activities consume more data. Streaming videos, playing online games, and using video conferencing tools are all data-intensive activities. Reducing the use of these applications or using them only when connected to a Wi-Fi network will significantly decrease your data usage.
Secondly, most mobile devices offer built-in data usage monitoring tools. For instance, Android devices have a ‘Data Usage’ option in the ‘Settings’ menu that reports the amount of data used within a certain timeframe. Similar features are available on iOS devices. These tools also allow you to set data limits and alerts when you approach your data cap.
For more in-depth monitoring, several third-party apps provide detailed reports of your data consumption. Apps like My Data Manager and GlassWire give you a breakdown of which apps consume the most data and when. These tools can also send alerts when you’re nearing your data limit.
On the other hand, if you’re more concerned about data consumption on your home network, consider using a network monitoring tool like NetWorx or Bandwidth+. These software applications monitor all devices connected to your network and provide comprehensive reports about each device’s data usage.
Additionally, most internet service providers (ISP) offer tools to help you monitor your data usage. These tools are typically available on the ISP’s website or mobile app. They provide data usage reports and alerts, and some even give you suggestions on how to reduce your data consumption.
In conclusion, there are several strategies and tools to effectively monitor your data consumption. By understanding which activities consume more data, using built-in and third-party monitoring tools, and taking advantage of your ISP’s resources, you can better manage your data usage and avoid unexpected overage charges.
Using Unity Wireless Abroad: Guidelines for Using Unity’s Internet Service When Traveling
Utilizing Unity Wireless abroad involves following some essential guidelines to ensure smooth operation of Unity’s internet service. Before traveling, it’s crucial to verify whether Unity’s coverage extends to your destination. This can be done through their website or customer service. It’s also essential to understand the cost implications involved. Some locations may come with higher charges, therefore understanding the tariffs in advance can help you plan effectively and avoid unexpected expenses.
It’s also recommended to check your device’s compatibility with the frequencies used in the country you’re traveling to. Unity’s customer service can assist with this information. If your device isn’t compatible, consider renting a device or purchasing a local SIM card.
Additionally, it’s advisable to adjust your device settings to reduce data usage while abroad. This could involve disabling automatic updates, restricting background data, and using Wi-Fi when available. Unity Wireless may also offer data packages specifically designed for international travel.
In the event of technical difficulties, it’s important to have Unity’s customer service contact information at your disposal. This includes international dialing codes to ensure you can reach them from your travel destination.
Lastly, it’s vital to keep your device secure while using public Wi-Fi networks. While Unity’s service may be secure, public networks may not offer the same level of protection. Consider using a virtual private network (VPN) to encrypt your data and keep your personal information safe.
Adhering to these guidelines can help ensure a seamless experience using Unity Wireless service abroad. This allows you to stay connected, whether it’s for business, staying in touch with loved ones, or sharing your travel experiences on social media. Always remember to plan ahead, understand the costs involved, and take steps to protect your device and personal information.
Seeking Assistance: How to Reach Unity Support for Further Help
When you encounter challenges or difficulties while using Unity software, you may need to seek assistance from Unity Support. This dedicated team of experts is ready and eager to help you troubleshoot issues, answer questions, and guide you through the utilization of their platform. To reach out to Unity Support, navigate to the Unity Support webpage.
Here, you will find a variety of resources, including a detailed FAQ section, a number of tutorials, and a vast community forum. If the provided resources do not address your specific issue, you have the option of submitting a support ticket. To do this, click “Contact Support” and fill in the necessary information about your problem.
Upon submission, your ticket will be sent to the support team, who will then reach out to you to provide the help you need. For urgent matters, you can opt for the premium support, which comes at an additional cost but guarantees a faster response time. Additionally, there is also a chat option available for real-time assistance, which can be found at the bottom of the support page.
Unity Support is dedicated to ensuring all users can effectively use their software, and they are ready to provide assistance whenever necessary. Take advantage of these resources when you need help, and don’t hesitate to reach out to the support team when you require further assistance.
Conclusion: Final Thoughts on Setting Up Unity Wireless Internet on Your Android Device
In conclusion, setting up Unity Wireless Internet on your Android device can be a straightforward process that offers a multitude of benefits. This procedure enables seamless connectivity, allowing you to access the internet from any corner of your home or office with a strong, consistent signal. It’s essential to follow the detailed steps accurately, ensuring that your device is correctly configured to the Unity Wireless network.
By doing so, you can avoid potential connectivity issues and enjoy a superior browsing experience. It’s also crucial to keep your network secure by setting a robust password to prevent unauthorized access. While the process might seem daunting initially, especially for those not tech-savvy, the long-term advantages far outweigh the initial setup’s complexity.
Once established successfully, Unity Wireless Internet can provide a reliable and fast internet connection, enhancing your online activities, be it video streaming, online gaming, or simply browsing. Additionally, it’s advisable to regularly check for system updates to maintain optimal performance and security.
Through this, you can ensure that your Android device remains connected to the Unity Wireless Internet, providing you with uninterrupted and high-speed internet access. Remember, patience and precision during the setup process can lead to a rewarding and efficient wireless internet experience.